Author Archives: Alan Croll

TMRNL – My first plugin (Syncing Apple reminders)

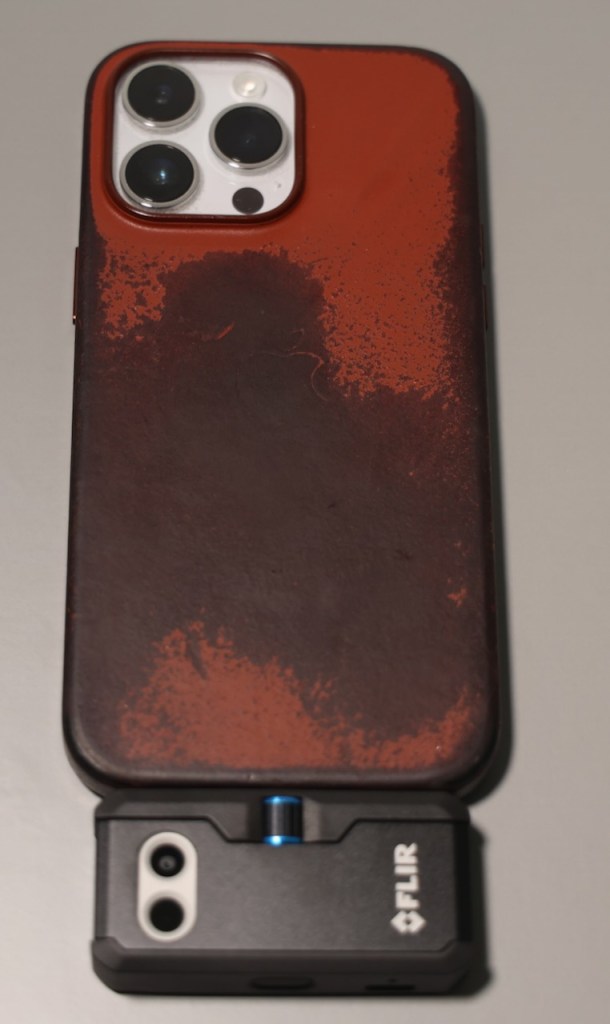
I picked up a TRMNL earlier this year and have enjoyed experimenting with it. It’s an e-ink display with a battery and microcontroller in a sleek case, complete with a wall-mount hook.

Screenshot

What drew me in was the flexibility: no power or network cables needed, strong developer docs, BYOD/BYOS support, and open-source firmware. Even if TRMNL disappeared tomorrow, the device would still be usable.

With a developer license, you can create custom plugins. I’ve built two so far:

  • Apple Reminders sync using a Webhook
  • Timesheet overview using Polling

Under the hood, the firmware connects to TRMNL’s backend, which manages the plugin playlist and generates images server-side. Plugins are split into data and view (markup) components.

Sharing Data with Plugins

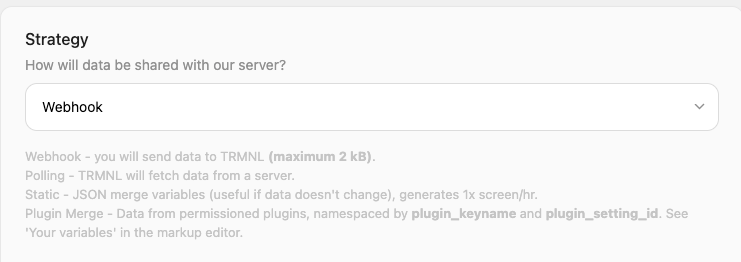
Data can be passed to a plugin via strategies like Webhooks or Polling. For Webhooks, TRMNL provides a custom URL that accepts HTTP POST data, which is then rendered via HTML + Liquid templates.

Once created, a plugin can be added to your playlist and scheduled to refresh at set intervals.

Apple Reminders Syncing

For syncing Apple Reminders (similar to Snazzy Labs’ setup), I use an Apple Shortcut to export my top 10 reminders, including tags and priority. The shortcut sends them via HTTP POST to my TRMNL Webhook.

In the TRMNL web interface, I created a plugin with:

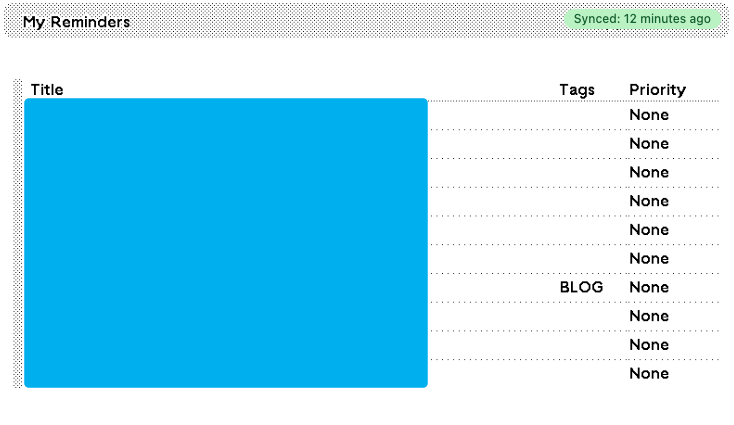
For the display, I used this markup with Liquid syntax (seen within the tbody tag) to loop through the reminders and render a table:

<div class="title_bar">
  <img class="image" src="/images/plugins/trmnl--render.svg" />
  <span class="title">My Reminders</span>
  <span class="instance">Apple Shortcuts</span>
</div>
<div class="layout layout-col gap--space-between">
  <div class="grid grid-cols-1">
    <div class="item">
      <div class="meta"></div>
      <div class="content">
        <table class="table table--condensed">
          <thead>
            <tr>
              <th><span class="title title--small">Title</span></th>
              <th><span class="title title--small">Tags</span></th>
              <th><span class="title title--small">Priority</span></th>
            </tr>
          </thead>
          <tbody>
            {% for Item in Items %}
            <tr>
              <td><span class="label">{{ Item.title }}</span></td>
              <td><span class="label">{{ Item.tags }}</span></td>
              <td><span class="label">{{ Item.priority }}</span></td>
            </tr>
            {% endfor %}
          </tbody>
        </table>
      </div>
    </div>
  </div>
</div>

Which renders like this:

Enabling Rubrik storage integration using PowerShell

Rubrik supports doing SAN-integrated snapshots to perform backups of virtual machines similar to other backup products. My experience with Rubrik is that it seems to perform each backup as an individual task rather than trying to perform all the required operations on a target at the same time. For example, if you have an SLA policy targeting a SQL database/instance it will run as a separate process to the VM image based backup of that SQL server.

This seems to extend to how it performs backups with storage integrated snapshots, it doesn’t do any analysis of the VMs on each datastore to target multiple VM backups with the same storage snapshot. This seems to be the reason that Rubrik recommends using the storage integrated snapshot feature for specific workloads only.

For one of my recent clients, I quickly wrote the below script for enabling/disabling storage snapshots using their PureStorage FlashArray across their entire VM environment. To use it, you need to configure an API token for Rubrik and then run it against the target Rubrik Brik local API endpoint.


$rubrikURL = "https://rubrik.fqdn.internal/api/" # update me

# Get the API Token for the api requests
if ($token -eq $null) {
$token = read-host -Prompt "API Token for $rubrikURL"
}

# Connect to Rubrik and get a list of virtual machines
$endpoint = "v1/vmware/vm"
$uri = "$rubrikURL$endpoint"
$data = Invoke-WebRequest -Method Get -Headers @{ "accept" = "application/json"; "Authorization" = "Bearer $token" } -uri "$uri"
$vmlist = $data.content | convertfrom-json | select-object -ExpandProperty data

# Get more details about each VM
$vmdetails = @()
foreach ($vm in $vmlist | select-object -first 2) {
$vmid = $vm | select-object -ExpandProperty id

$endpoint = "v1/vmware/vm/$vmid"
$uri = "$rubrikURL$endpoint"

$data = Invoke-WebRequest -Method Get -Headers @{ "accept" = "application/json"; "Authorization" = "Bearer $token" } -uri "$uri"
$detail = $data.content | convertfrom-json
$vmdetails += $detail
}

# Detail the VMs and VMs that require updates
write-host "VM Details:"
$vmdetails | ft id,name,isArrayIntegrationPossible,isArrayIntegrationEnabled
write-host "VMs capable of array integration (but not yet enabled):"
$vmsrequiringupdate = $vmdetails | where-object { $_.isArrayIntegrationEnabled -eq $false -and $_.isArrayIntegrationPossible -eq $true}
$vmsrequiringupdate | ft id,name,isArrayIntegrationPossible,isArrayIntegrationEnabled

# 'Patch' each VM to enable array integration
foreach ($vmdetail in $vmsrequiringupdate ) {
$vmid = $vmdetail.id
$endpoint = "v1/vmware/vm/$vmid"
$uri = [uri]::EscapeUriString("$rubrikURL$endpoint")

write-host "Processing $($vmdetail.name) with id $vmid at $uri " -NoNewline
$patchdetails = @{ "isArrayIntegrationEnabled" = $true } | ConvertTo-Json -Compress # change to false to disable storage snapshots

# Perform the patch request
$data = Invoke-WebRequest -Method "Patch" -Headers @{ "content-type" = "application/json"; "accept" = "application/json"; "Authorization" = "Bearer $token" } -uri $uri -body $patchdetails -ContentType "application/json"

if ($data.StatusCode -eq 200) {
write-host "(Status $($data.StatusCode))" -ForegroundColor Green
} else {
write-host "(Status $($data.StatusCode))" -ForegroundColor Red
}
}

NSX Edge lose of network connectivity on Broadcom BCM57414 NICs

At a client recently their VM NSX Edges were periodically losing most of their network connectivity until vMotioned to another host. We were also periodically seeing this on Windows VMs but not to the same extent likely due to the reduced network utilisation of a Windows VM compared to a NSX Edge.

NSX Edges are used to create virtualised Tier 0 / Tier 1 routers which peer to the physical network using a routing protocol such as OSPF or BGP; this then allows routing from the physical network to software defined NSX overlay networks. The majority of this client’s workload was running was running in NSX overlay networks and as you can imagine randomly losing the data path on an NSX Edge caused a lot of critical outages for clients outside the environment. Servers (within that VRF) could continue to communicate with other servers as they were not routing via the NSX Edge Node as they were routed via the Distributed Logical Router on the ESXi host (or in the same overlay network).

This client was running HPE Gen10 Servers with ESXi 7 & NSX 4.1 on hosts with Broadcom Network Interface cards (Broadcom BCM57414 Ethernet 10/25Gb 2-port SFP28 Adapter for HPE) with the latest HPE Service Pack for Proliant installed (2023.09) & up to date vCenter/ESXi/NSX.

The HPE SPP for Proliant (2023.09) incorporates these NIC firmware/driver versions for this card:

  • Firmware: 226.1.107.0
  • Driver: 226.0.121.0

What we eventually found after much troubleshooting of the physical network, ESXi, and NSX was there was a bug in the Broadcom Network Interface drivers (Broadcom defect ID: DCSG01533090) which can cause Windows virtual machines to lose connectivity when using VNXNet3 Adapters. Our suspicion was that this was bug was also causing an impact to the NSX Edge appliances but just slightly differently to how it was impacting the Windows VMs.

Broadcom 226.0.145.4 Network Driver release notes

Updating the NIC Driver in ESXi from 226.0.121.0 to 226.0.145.4 (after verifying some other VMware HCL requirements) incorporated the fix which resolved the issue and the NSX environment has been stable for several months since the update occurred.

Veeam Job Status tip

Working recently with a colleague I mentioned using the left & right arrow keys to move between status reports for jobs within the Veeam console which they didn’t know about.

When you have the job status window open you can press left to go to the prior job report or right to go to the latest/next job report. It simplifies having to go to the job log to see how a job has been performing.

Veeam job status (image taken from https://helpcenter.veeam.com/docs/backup/hyperv/realtime_statistics.html?ver=120 )

The Veeam support article for viewing real time statistics mentions this in a tip:

Veeam tip for status (image taken from https://helpcenter.veeam.com/docs/backup/hyperv/realtime_statistics.html?ver=120)

FLIR One Pro iOS Thermal Camera with USB-C to Lightning adapter

Why a thermal camera?

Last year I purchased a FLIR One Pro for iOS thermal camera with the intention of identifying areas of our house where we were not thermally efficient. While this provided some insights it didn’t lead to any action items as most of the issues where related to larger budget items (such as replacing glass windows).

The best use of the FLIR camera that I’ve had so far was a local neighbour who thought they had something decomposing in their roof due to the smell in that room, unfortunately the type of insulation in the roof didn’t let them identify the issue visually. Using the thermal camera we were able to look at the ceiling of the room and identify a hot spot of a few degrees where we suspected the issue was located. They were then able to access that specific part of the ceiling and remove the decomposing animal sorting out their issue. It was pretty nifty!

Compatibility with USB-C

The FLIR One Pro is an excellent little device however it does connect via the Lightning port on iPhone/iPad and of course Apple has now moved to USB-C for the iPhone 15 generation so it won’t connect directly anymore.

FLIR One Pro connected to my iPhone 14 Pro

Apple does sell an adapter on their website “USB-C to Lightning adapter” for AUD $49 which has a male USB-C port on one end and a female Lightning port on the other to allow connecting lightning accessories via USB-C. This was released around the time of the iPhone 15.

Apple USB-C to Lightning Adapter

I ordered the Apple USB-C to Lightning adapter to test if the FLIR camera would continue to function if I decided to upgrade to a newer iPhone in the future or if people who had newer iPhones wanted to borrow it.

How I store the USB-C to Lightning Adapter

This also got me wondering if this will function with devices other than the iPhone such as Android.

DeviceFunctional?Comment
iPad ProYes
Pixel 4a running Android 13NoDevice seems to try to connect but the FLIR camera just makes clicking noises and does not function
Colleague’s Android device (unknown version)NoSame as the Pixel 4a
Results

### iPad Pro interactions

The iPad Pro worked without issue.

iPad Pro testing

### Pixel 4a interactions

The Pixel 4a was updated to Android 13 & had all possible application updates applied as of 2nd January 2024. It consistently went through the trying to connect screen before failing and retrying.

Data Centre Equipment / EVERGOODS CAP1

Introduction

As part of my job I regularly go travel to client sites and data centres, and I find that keeping my tools/equipment organised makes it a significantly more productive experience. Prior to organising myself as I do currently I needed to keep a checklist to ensure I was taking the required equipment and then digging around in my backpack to find where I had stowed equipment.

I currently utilise a EVERGOODS Burnt Orange Civic Access Pouch 1L (CAP1) to store and carry my key data centre equipment including:

  • 5 metre USB cable
  • 1 metre USB cable
  • USB to Ethernet adaptor
  • 25cm CAT6 Ethernet cable
  • USB serial adapter for Cisco Consoles
  • USB serial adapter for PureStorage FlashArray consoles
  • USB hub / flash drives
  • Male IEC C14 to female Australian GPO cable

My preference with data centre work is to use a generic long USB cable and connect the specific adapter as required, this allows me to easily work from a cool aisle or in a more comfortable position. It’s definitely preferable to have the data centre staff set up a network link from a rack to a staging room when you’re doing extended work onsite.

At some point in the future I’ll probably swap out the USB-A extension cables for USB-C ones, this will allow the use of a USB-C dock at the rack end allowing multiple connections (serial and ethernet at the same time).

EVERGOODS company background

EVERGOODS produces high-quality, thoughtfully designed crossover equipment that is built to last. I own a number of EVERGOODS products each with a distinct purpose for me, the first products I bought from them was in January 2019 (when the company was only a few years old) which included the Civic Panel Loader 24L backpack which I used as my daily backpack for several years.

Thoughts on the CAP1 as a product

It has great organisation with 2 main zippered mesh pockets & a pen slot, each main pocket is further subdivided into sections to keep things separate and organised. This allows me to organise my equipment rather than just putting it into a single space.

I like that the EVERGOODS CAP1 uses a innovative magnetic closure system to close in a number of different ways/shapes, it allows it to expand and not just close in a single way.

The main negative with the CAP1 is that it is only a 1 litre capacity so it can sometimes be a struggle to get larger items to fit or items to fit neatly into the space (such as the IEC to GPO power cable needs to be placed in a specific way to fit with other things).

Conclusion

The EVERGOODS CAP1 is probably one of my favourite organisation tools and I love just being able to grab a single pouch containing the majority of the tools I require when not physically installing/removing equipment in a data centre.

If you’re interested in an EVERGOODS CAP1 or other products, be aware that EVERGOODS does occasionally do free international shipping for larger orders which makes it significantly cheaper to buy their products in Australia, otherwise Rushfaster does also offer them with reduced shipping costs for Australia.

Effectively performing initial backup of VMs over throttled network links using Veeam

Recently I’ve been backing up some large virtual machines over a WAN and wanted to detail the way I’ve approached this challenge.

Situation

  • Veeam Infrastructure is primarily located in the primary data centre
  • Multiple remote sites with a mix of Hyper-V and vSphere environments
  • High speed WAN to the majority of remote sites (>= 1 Gbit/sec)
  • Remote sites typically did not support Veeam WAN acceleration with existing hardware
  • Remote sites have several very large virtual machines (10 TB+) in addition to regular VM workload.

Approach

Network throttling was enabled between the Veeam Infrastructure in the core data centre to the remote Hyper-V Hosts (on-host proxy mode) and a vSphere proxy at each remote site. Each site had specific network throttling requirements but generally this was somewhere between 300-500 Mbps 24/7.

The Veeam Repositories were formatted using ReFS with 64K blocks to support linked clones for faster synthetic full backups. Each backup job was then configured for a singe large VM in an Incremental Forever mode with Synthetic Full backups occurring weekly (& no Active Full Backups), as the data was traversing a throttled WAN the Compression mode was configured to Optimal.

For each large VM, I then went and modified the exclusion list for disks and added an individual disk and performed a backup; once each backup was completed I added additional drives and started another backup. Once all drives were completed, I then reconfigured the disks to process back to “All Disks”.

Outcome

This approach was quite successful had the following benefits:

  • It didn’t tie up remote proxy tasks for an extended period of time potentially preventing the backup of other virtual machines at the remote site. Each new disk was consuming a single proxy task and existing disks were significantly faster as it only required an incremental backups.
  • Using a dedicated backup job for the large VM meant that the long run time didn’t impact other VM backup operations.
  • Each Virtual Disk was not competing with other virtual disks for bandwidth during the initial backup allowing each backup to complete faster. For some disks this still took multiple days.
  • It provided an immediate restore point for a subset of data when the initial & each subsequent backup completed.
  • It allowed stop points between each backup if maintenance was required on the Veeam infrastructure.

Veeam Compression & De-dupe appliances

Veeam offers a number of configuration settings for compression and deduplication when using backup and backup copy jobs and its important to configure these correctly when using de-duplicating storage appliances as a backup repository.

On a backup and backup copy job there are a number of options for configuring the compression level as seen in the image below, and if configured these settings will be used from the first Veeam component involved in the backup (typically a backup proxy). In the case of a Hyper-V host using on-host proxy mode, this is also the source hypervisor.

Veeam backup job compression level settings

Configuring this option as ‘Optimal’ is generally recommended as this will reduce the network throughput requirements and storage requirements. Veeam provides some feedback on the configured compression-level option:

Veeam compression level None feedback
Veeam compression level Dedupe-friendly feedback
Veeam compression level Optimal feedback
Veeam compression level High feedback
Veeam compression level Extreme feedback

It’s quite rare to utilise the High/Extreme compression levels in a Veeam environment due to the significant increase in CPU utilisation, if you intend to utilise these options I would strongly recommend targeting very specific workloads with a separate backup job for that purpose.

On the backup repository side there is also an additional option to decompress backup data before storing. This is typically used for deduplicating storage appliances such as the Dell EMC Data Domain or PureStorage FlashArray //C where the appliance performs storage efficiency. This allows the appliance to see the full set of backup data and implement compression/deduplication optimally for that appliance.

In environments with high-speed networking, hyper-v hosts with on-host proxy mode and deduplicating storage appliances it is worthwhile performing tests with the backup job compression level to ‘Dedupe-friendly’ or ‘None’ with decompress backup file data blocks before storing enabled on the repository. This may reduce the compute workload on the host and allow for backups to complete in a more timely manner as it will not be performing compression and decompression on the proxy and repository server respectively.